Pages

Wednesday, May 30, 2012

Garden Update

I am almost finished putting in my summer garden. So I thought I would give you an update on what went in this year:

  • Planted five Seminole pumpkins.  I plant this pumpkin every year.  It's a great producer. One plant produces about 10 pumpkins.  Seminole pumpkins are mislabeled, they are more like winter squash. The Seminole Indians grew them in the 1500's in the Everglades in south Florida.  They are great for this part of the world because they are not bothered by either bugs or diseases of any kind. They are sweet and tasty when served like winter squash.
  • Planted six summer squash.  This is an heirloom called Early Prolific Straight Neck. I love it!  It keeps producing and producing.  However, here in the hot & humid south, it does get a lot of powdery mildew that requires spraying with a powdered milk and baking soda mix.  Doesn't matter to me, I still love it.  I expect to get about 200 squash this year.  I need at least 150 to make it one year without having to go to the store to buy them.
  • Planted four hybrid acorn squash. I don't have a yearly goal for this winter squash, I just eat it fresh when I have it but I don't bother to purchase any from the store when I don't have it.
  • Planted 80 green beans so far. I have room for 240.  I may just plant 160 and then use the rest of the raised bed for something else. I need 51 quarts to make it one year without purchasing any from the store.
  • Planted 135 peanuts.  80 are Spanish peanuts and 55 are Virginia Jumbo.  Normally, I plant just Virginia Jumbo.  I switched to some Spanish peanuts because they have more oil in them. I am going to try to produce my own cooking oil this year.  That will be one more item I can stop purchasing from the store!  We don't use much oil in our cooking so I am shooting for 1 gallon of oil and I expect that to last most (if not all) of the next year. Will 80 plants produce enough peanuts to make 1 gallon of oil?  I have no idea!  I will let you know at the end of the summer.
  • Planted five sweet potato slips.  I received these slips in March.  I was too busy with work to plant them and so they sat in a vase of water on the kitchen counter (by the window). I put them in one week ago.  Three of the slips don't look like they are going to make it.  Next year, I will just take an afternoon and plant them when they arrive rather than put it off.
  • Planted about 30 tobacco seeds.  Many of them germinated, but when transplanting, I eliminated some of the smaller ones.  I now have 13 plants in six pots. You may be wondering what I do with the tobacco.  Well, I use it as an insecticide!  It is the only chemical insecticide I use and it is organic.  I put many of my houseplants outside for the summer. When fall arrives and its time for the plants to come in, they get sprayed with a tea made from tobacco.  It kills any bugs that may be lurking on the plants and no bug problems all winter long in the house.  Here is a picture of my newly transplanted tobacco.  Tobacco plants also make very pretty trumpet like flowers in September.


Last week, I also harvested the onions I planted in early spring. This is year two for these onions. I planted seeds last year, then stored the tiny onions (called sets) over winter. I put the sets out in late February.  I got 46 - plenty to last all year for our family.  I planted a day neutral hybrid called Candy.  Very easy to grow and my husband says quite tasty.  I will dry them and make onion powder.  Here they are waiting their turn in the dehydrator on my dining room table


I will be sure to take pictures and post updates as the summer progresses!

Tuesday, May 29, 2012

Do You Compost?

You can easily make your own compost! If you are allowed to have a compost pile in your neighborhood you can make one following these instructions:
  1. Place four wooden stakes or metal poles in the ground. Ideal size is 4 X 4, but a 3 x 3 or 5 x 5 will work as well. Poles or stakes should be 3 to 4 feet tall.  Wrap the poles with chicken wire and secure the wire together at the ends.
  2. Place course material in the bottom of the bin you just created. This can be straw, hay, pine straw, corn husks or other course material.
  3. Add an 8' to 10" layer of leaves.
  4. Add a shovel full of soil. Any soil will work.
  5. Add a 2" to 3" layer of grass clippings. It is best not to use grass clippings that have been treated with pesticides.
  6. Add water.
  7. Start layering over with step #3. Repeat until you fill the bin.
If you live in a neighborhood that has covenants against compost piles, you can purchase a closed one like this Closed Compost Systems.

What do you put in a compost pile?

Leaves and grass are staples of any compost pile. You will need to keep a good balance of brown material (leaves) to the green material (grass). It should be about a 25 to 1 ratio of leaves to grass.  Keep this ratio and the pile won't smell. You can add lots of other things to your compost pile as well.

If you don't have any leaves, you can add:
  • Newspaper
  • Paper plates (make sure the package states they can go into a compost pile)
  • Hay, straw or pine straw
  • Sawdust (not too much or you can compensate by adding more nitrogen)
  • Dryer lint
  • Wood ashes (not too many)
If you don't have any grass clippings without pesticides, you can add:
  • Vegetables scraps from the kitchen (veggie peelings, fruit peelings, eggshells, and/or coffee grounds)
  • Manure from animals that do not eat meat
  • Weeds (preferably before they flower and set seed)
  • 10-10-10 fertilizer (small amounts - you can use fertilizer if you don't have anything else in this list to replace the grass. It can also be used to help break down sawdust.)
To keep the compost pile healthy, you shouldn't add:
  • Diseased plants
  • Meat
  • Oily food scraps
  • Dog/cat manure
  • Invasive weeds
Turn the pile every three weeks or so if you want compost in about one year's time. If you don't want to turn the pile, you will still get compost, but it can take two to three years before it is ready. 

If you make an effort, you will never have to purchase potting soil again!

Monday, May 28, 2012

Happy Memorial Day!

Today is the day we honor all service members who gave their life in defense of our country. Remember all of those brave men and women who died so we could stay free. While you're at it ,don't forget to say thank you to the veterans and active duty service personnel for their sacrifice.  If you have a family member who has served this great country, give him or her a hug.

If you don't have any family members who have served, find a vet and do the same thing.  I bet you have one as a neighbor! 

Then, go and enjoy time with your family. When everyone is seated and ready to eat, say a prayer for those service members who have died to keep you free.

Enjoy your day!

Friday, May 25, 2012

Gardening In Raised Beds

Today I put in the squash and pumpkins. Since the soil here is nothing but clay, we use raised beds. Raised beds allow us to control the soil the vegetables grow in and we can tailor it to the needs of the plant. Here is a picture of one of my raised beds left over from last year.


I use a unique method of preparing and managing the garden. It's different from 99% of the gardens around the world but I bet you'll find it can really help you succeed with your garden. One of the key differences in how I manage my garden is bug control.  I aim for minimal to no bug damage each year. However, I don't use chemicals for bug control, even organic ones. This requires a completely different way of looking at the problem of bug control. Let me explain how you can garden bug free too!  

The first step to keeping bugs under control is good soil.  If you read Mel Bartholomew's New SquareFoot Gardening book, he states that good soil is a mixture of 1/3 organics (read that to mean compost), 1/3 peat moss, and 1/3 vermiculite. I agree with and follow his advice. Just add the mixture in the amounts listed to prepare the soil if you are starting from scratch.  Think of it as a one time investment. If you have already created your raised beds, you can continue to improve your soil by adding compost. Even if you don't use raised beds, you can still greatly improve your soil by following Mel's advice and adding the ingredients above as well.  Don't worry if you don't have a compost pile, you can easily purchase bags of compost at a local gardening center.  However, it is much cheaper and easier to make your own.  Look for a post on how start your own compost pile next week.

So, to refresh the soil from last year's garden, you need to add soil amendments.  I added compost and a bit of 10-10-10- fertilizer.  The fertilizer was in support of my favorite squash. Since squash are heavy feeders they'll need additional fertilizer throughout the season.  Mix the amendments into the soil and rake flat.  Since our summers are hot and can be dry as well, I added a soaker hose.  Here is a picture.


This is where I break with conventional gardening practices. The next step is to cover the entire bed with aluminum foil (shiney side up). I haven't seen this technique covered in many other blogs or gardening books, but it really does work great!  It keeps the bugs away. Here is a picture of the bed half covered.


It is a little hard to see in this picture, but the aluminum foil is simply taped together using regular scotch tape. I placed about a 2" piece of tape every 2 - 2 1/2 feet.  I also stapled the foil to the wood of the raised bed.  Here is a close up of the staples.  The image isn't too clear the sun was shining directly on the foil. But, you can still make out two of the staples.


What exactly is the aluminum foil doing?  Well, the foil confuses bugs that want to land on the leaves and deposit their eggs.  The bugs can't figure out which side is the underside of the leaves because the sun appears to be shining on both sides. They move on to an easier plant.  This treatment works extremely well for squash vine borers, squash and stink bugs and mexican bean beatles.  Unfortunately, all of these pests are in great supply where I live.  My raised bed is about 25 feet long. It took four passes to cover the whole bed.  I bought a 250 sq ft roll of aluminum foil on sale last Christmas (purchased with coupons!) and I used half the roll. All together it cost me just a few dollars to cover the 25 foot long bed. It is a lot cheaper (and safer) than spraying chemical pesticides all season long. 

Once the beds are covered, you can plant your seeds. Poke a hole in the aluminium foil where you want to put the seed.  Make the hole fairly large to accomodate the seed and let the sun shine on the soil.  Here is what mine looks like.  Remember, I only planted squash and pumpkins in this section.


The last step is to poke some drainage holes in the foil so water will seep in when it rains.  Go easy on the poking, you don't really need too many holes.  The rain will find the soil through the gaps in the foil. What I do is spray the foil with the hose and see where the water is standing in puddles. Then, I poke holes there. I use a fork to keep the holes small.


If you have a plant that requires additional feeding throughout the summer, you can add fertilizer in the gaps in the aluminum foil.  Be careful with the application and you shouldn't have to worry about tearing the foil.  If you accidently do tear the foil, just cover it with scotch tape.  I am amazed each year how well the scotch tape holds.  It doesn't have to hold forever, just until the plants appear. Once they start to come in, the weight of the plants will hold the foil down.  I have yet to require a large repair job. The foil just seems to stay in place. 

This works so well, I know I won't see any bugs at all until late August.  That is when the leaves grow so large that they completely cover the foil and the sun can't reach it.  At this point, I start spraying, if necessary.  However, I don't use conventional sprays.  My motto is, "If you can't eat it, don't spray it on the vegetables!"  I promise I will cover what to do about bugs in a future post.  In the meantime if you have a bug problem, email me and I will be happy to help. 

Happy Gardening!

Thursday, May 24, 2012

Growing Tomatoes in Pots

Growing tomatoes is fun!  They grow easily in pots which works really well if you have limited space like me. You can avoid some common problems later in the growing season by properly  preparing them for transplanting. You won't find most of these tips in gardening books.  They are the things I learned through many, many long conversations with avid gardeners combined with 25 years of personal experience in the garden and a master gardener certification.

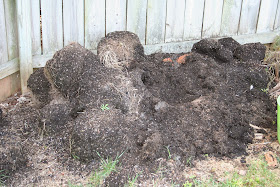
In my garden, I use commercial potting soil. No need to get new bags every year,I resuse the same soil from year to year. Here is my pile of potting soil from last year's tomatoes.  It sat like this all winter.


Now that I am ready to use it again, I will need to refresh the soil by adding some admendments.  I added a bit of fertilizer, (tomatoes are heavy feeders) and some compost.  Here is the refreshed soil ready to go into my pots.


The first thing you need to do is find a suitable pot.  The 3 gallon buckets you got from the grocery store for free work really well for tomatoes (see Monday's post) and the best part about using them is you won't need to repot again later in the summer. That is what I am going to use here.

Planting tomatoes in pots does require some additional amendments. These amendments help tomatoes planted directly into the ground as well. To add amendments, fill about 1/3 of the pot with the soil. Then add four antacid tablets to the pot. Yes, antacid tablets!  I use the big box store brand . Doesn't matter if it is fruit flavored or mint. I use 750 mg.  This stuff is calcium carbonate which tomatoes need to prevent blossom end rot.  Don't put too many in the pot at once. If there is too much calcuim in the soil, the tomato can't get the other trace minerials it needs (such as baron).  My experience has been that four antacid tablets seem like the right number to add at the time of transplanting into a large pot or bucket.  You will need to add two or three more to the pot each month to prevent blossom end rot.

If you are placing your tomatoes directy in the ground, you are less likely to have a problem with blossom end rot so only put the four in the hole with the tomato when you transplant it, you won't be adding more tablets each month.

The other amendment I use is Agrosoke crystals.The label calls them Root Watering Crystals, Agrosoke is the brand name. I get mine at one of the home improvement centers in the gardening department. This stuff will help keep the soil evenly moist between waterings or rain. Evenly mosit soil reduces blossom end rot and split or cracked tomatoes. Here is what the pot looks like when you add the soil amendments.


At this point, you can add a couple of additional handfulls of dirt, then mix it well or just leave it like you see in the picture and fill the pot up with soil.

Now, lets address the tomato plant itself. Tomatoes transplant easily. However, to give the plant the best possible chance to establish itself in its new home, submerge the plant in the soil up to the top leaves.  Do this whether you plat the tomato in a pot or in the ground. Before submerging it, remove all the bottom leaves.  You can just pinch them off with your fingernail.  Here is a before and after picture to show you what I mean.


Now the tomato is ready to be planted. Gently firm the soil around the stem of the tomato so it doesn't break.


Tomatoes don't like to have the soil splash on their leaves so the last step is to mulch the plant.  You can use hay, small pebbles or pine straw.  The point is to make sure when you water or when it rains, the leaves don't get dirt on them.  I use pine straw because it is widely available here in the south. 

So there you have it!  A tomato plant transplanted to its new home and all set to grow and produce wonderful jucy tomatoes for eating all summer long!

Monday, May 21, 2012

Gardening In Pots

It is time to put in the summer garden here at Whispers From Elizabeth.  Having a long growing season means I can take my time putting in the vegetables and still get good results.  Since our area usually doesn’t get first frost until mid-October, we still have a good five months left in the growing season.  Today, I put in the sweet potatoes.  I really don’t have the room in my garden to grow sweet potatoes, but that doesn’t bother me!  I grow them in in pots.  Yes, you can really grow sweet potatoes in pots! In fact, lots of vegetables will be quite happy growing in pots.  I have successfully grown all the following vegetables in pots:
  • Tomatoes
  • Green beans
  • Carrots
  • Potatoes
  • Sweet Potatoes
  • Peanuts
  • All kinds of herbs
You may be thinking, “Purchasing pots for all those vegetables can be expensive.”  Not at all.  You can get pots for free, I usually pick up some every year and it saves a ton of money.  All you have to do is go to the grocery store and ask someone in the bakery department if they have any buckets they are throwing out.  Every time I have asked, the store employee has taken the time to go and look.  If they don’t have any available, they tell me when they usually have extra buckets (Thursdays and Fridays in my area). Some stores will even hold them for you or call you when they have them available.

Wash the buckets out and they are ready to use.  It is important to use food grade buckets so the plants don’t pick up any chemicals that may have been used in making non-food grade buckets.  Don’t forget to put some holes in the bottom.  I usually don’t drill the holes, because I think it is a pain to get the drill out.  I drive a nail into the bottom of the bucket.  Once I have a good size nail  hole, I open it up a bit more with a screw driver.   Here is one I did last year.


If you plant potatoes or sweet potatoes in the buckets, add some sand to the potting soil. I get great results using potting soil with fertilizer added.  No need to fertilize potatoes again during the season, they don’t need a lot of fertilizer. Sweet potatoes will need some extra fertilizer a little later in the season.  For the sand, I use regular sand box sand from the big box stores. I shoot for a ratio of 60% potting soil and 40% sand.  I don’t measure, just eyeball it.  It is not necessary to get the exact ratio; you just want the soil to drain quickly so the potatoes don’t rot.  This is what mine looked like.


There is about two inches of soil in the bottom of the bucket.  Then I added a couple of handfulls of sand as seen here. 
Mix well and add to the pot.  I mix mine in small batches, pour it into the bucket, and mix more.  Sweet potatoes need about 12 inches of soil.  The small yellow bucket shown below is 11 inches tall (a three gallon bucket).  I also get great results using five gallon buckets with about 13 inches of soil in them.

I plan to put them along the fence where the vines can grow but won’t overtake my small yard.

No need to purchase new potting soil every year. You can definitely reuse the potting soil.  It will just need a bit of fertilizer next year.  And, there you have it - a garden in a pot!  I will show you how to plant tomatoes in a pot next.

Friday, May 18, 2012

Five More Uses for Vinegar

As I have mentioned before, I use vinegar to clean just about everything.  Even so, sometimes you have to add elbow grease to get things really clean. So, I was pleasantly surprised when I tested a new way to use vinegar for cleaning.  It worked really well and no scrubbing!  This one is first on today’s list.


  1. Heat 1 cup of vinegar in the microwave for 1 minute.  Pour into a spray bottle.  Add 1 cup of Dawn dishwashing liquid.  Shake to mix well.  Spray your shower and/or tub.  Let sit for at least two hours.  The more soap scum and hard water spots you have, the longer you should let it sit.  You can even let it sit overnight if necessary. Wipe down with a wet sponge and rinse.  That’s it!  Soap build up, dirt, grime, EVERYTHING disappears.  You are left with a clean shine.  It even smells pleasant – not like vinegar at all.  I saw this recipe on Pinterest.  I modified it a bit for half the tub to see if it made a difference.  First, I turned on the water to wet down everything.  Then, I sprinkled baking soda on half the tub. Then I sprayed the entire tub.  The half with the baking soda fizzled and foamed up and stayed put a bit better (good if using on vertical surfaces).  Go easy with the spray.  If you use a lot, it will take a long time to rinse because of the bubbles made by Dawn. On Pinterest, it specifically stated to use the blue Dawn, so that is what I did. It worked so well, I tried it on my grout.  My bathrooms are white.  White everything - to include the grout.  So as you can guess, it is really hard to keep the grout clean.  No more!  This mix did a great job on the grout as well.  I sprayed it on and after letting it sit for 2 hours, I lightly scrubbed with a stiff brush and then wiped it up with a damp sponge.  I will no longer use any harsh chemicals to clean my grout!
  2. My kitchen sink gets dirty, really dirty.  In addition to normal household chores, I use my sink sprayer to water plants. I also repot small plants in my sink. As a result, I wash my sink a lot.  Long ago and far away I used to use an abrasive powder cleanser with bleach.  Then I switched to my own dishwashing soap.  Now, I use vinegar.  Here’s how it works. Wet the sink and lightly sprinkle baking soda over the entire surface.  Pour about ¼ cup vinegar in the sink and let it foam.  Use a scrub sponge to lightly scrub and/or wipe out the sink. Then rinse.  I have been amazed that this seems to actually repel the dirt.  My sink stays cleaner, brighter and shiner longer and it is easier to wipe clean in between the vinegar cleanings.
  3. When washing fresh produce, add vinegar to the rinse water and you will remove any tiny bugs you may not be able to see.  This works great for garden vegetables such as carrots, green beans, squash, or broccoli.
  4. Wipe down your cutting boards with vinegar before washing them. It cuts down on grease and makes them easier to clean. Use it full strength, then wash as usual.
  5. Here is an idea women may find helpful! Nail polish will go on smoother and stay on longer if you wipe your nails down with vinegar. Saturate a cotton ball with vinegar and wipe each nail. Let dry. Then apply your favorite nail polish.
A word of warning when using vinegar with baking soda (or any other ingredient that makes it foam).  It is perfectly fine to use these ingredients together when in an open container, sink or bathtub.  Do not try to put foaming vinegar in a closed container.  It will not stay closed for long and you will have a big mess on your hands!
Vinegar is such a useful and natural product.  I love to find creative ways to use it.  If you have a creative use for vinegar, let me know.  I will include it in the next ‘Five More Uses for Vinegar” post!

Wednesday, May 16, 2012

How to Save $1,000 a Year (On Average) on Home Maintenance Costs

Do you own your home?  How often do you have to think about painting it?  Here in the south, we have to paint about every seven years.  It doesn’t matter what kind of paint is used.  15 year or 20 year paint, doesn’t matter.  At most a paint job lasts about seven years.  The main reason the paint won’t last here is mold.  Our air is so humid that mold grows on everything. Everything!  Mold can completely destroy a paint job, making it necessary to paint again and again.  The owners of a house in my neighborhood have painted their house twice in the time they have owned it.  And that doesn’t count when the builder painted it.  I moved into this neighborhood before that house was built. 

I have lived in my house for 11 ½ years. How many times have I painted my house? Zero. Why not? Pressure washing. I have my house pressure washed each year in the spring.  I have used the same company each year.  B & M Pressure Washing.


B & M Pressure Washing is owned by Bryant Holloway.  Bryant serves the Tampa metro area, Orlando metro area, Miami metro area and the Atlanta metro area. It doesn’t take him more than 1 ½ hours to wash my house.  The key is he uses bleach.  A note of warning, water your landscaping well the night before you have your house washed with bleach.  The bleach can burn tender or young plants.  I water my landscaping two nights in a row before Bryant is scheduled to pressure wash.  Rarely, have I had any landscaping damage from the bleach.

Now full disclosure here, I have spot painted sections of my house.  If the caulk breaks around the windows or trim, it needs to be replaced and then repainted. Also, the houses in my neighborhood have wood trim.  Wood trim doesn’t do well in high humidity.  It rots.  So, I have had to replace some wood trim with new composite pieces.  They are caulked in and then painted.  Still, the most I have spent on house maintenance dealing with paint is about $2,000 total over the life of the house. It is really just a couple of hundred dollars each year. And that includes the fee I pay Bryant every year.  It seems like a no brainer to me.

Planning to paint your house in a few years?  Pressure wash it every year and I bet you can skip that painting and save yourself the money!

Monday, May 14, 2012

Low Tech Dishwashing Detergent for High Tech Machines

We eat from our food storage all the time so I cook from scratch a lot. I wash some of the dishes by hand; some go straight to the dishwasher. I usually rinse the dishes so they can sit in the dishwasher until I have a full load. So, do I grab the latest high tech detergent? Heavens, no! I make my own and have been doing so for about five years. It is easy, inexpensive and our great-grandmothers used these ingredients to wash their dishes as well. You can find all the ingredients you need in the big box stores.


I encourage you to read the labels on the boxes, borax is recommended to boost the cleaning power of your dishwasher. The picture is missing some optional ingredients. Here is the basic recipe:

5 cups super washing soda
5 cups borax

I mix big batches and store it in empty vinegar bottles. I fill the pre-wash cup and then add about 2 TBS per load to the wash cycle dispenser. (Don’t forget the vinegar in the rinse cycle!)

If you have hard water, you may find this recipe leaves some residue on your dishes.  I don’t have hard water. It works just fine for me.  However, if you do have hard water you can add course kosher salt to the mix.  Here is the recipe:
5 cups super washing soda
5 cups borax
2 cups course kosher salt

This recipe is very forgiving and the ratio of ingredients is just a recommendation.  I have corresponded with some people who use twice as much borax as washing soda and swear it won’t work if the ratio is 1:1.  I have also corresponded with others who use more salt.  Experiment and see what works best for you.  This recipe for dishwashing detergent is so much cheaper, it doesn’t have a bunch of nasty chemicals in it and it is really, really simple to make.
I have one additional optional ingredient for those who want a lemon fresh scent.  That is unsweetened lemonade.  Use the two quart powder packet without sweetener.  You can buy a store brand; there is absolutely no need to spend more for one of the expensive, nationally known brands. I know a woman who always adds lemonade powder to her dishwashing mix.  She also uses a bit more salt because the water where she lives is very hard.

I admit I haven’t added lemonade to my recipe yet.  However, next time I mix up a batch I am going to try it.

Friday, May 11, 2012

Make Your Own Potpourri: Part I

Let me start with an apology for the quality of these pictures; they were taken with my really cheap cell phone. I promise I will get the digital camera out from the back of the closet next time!

I had to go to the dentist the other day and parked a bit away so I could walk.  My dentist is located in a shopping center so I got to window shop along the way.  When I crossed the parking lot, I stepped over one of the landscaped islands that you see in most shopping center parking lots.  I walked between some juniper bushes and to my surprise, I saw juniper berries!  I was so busy with daily life that I forgot this is the time of year juniper bushes set berries. 


Juniper berries in the shopping mall parking lot.

You are probably wondering why I am so excited over juniper berries. Well, juniper berries are a key ingredient in potpourri.  For example, here is a potpourri recipe from the book, Potpourri, Scented Souvenirs by Gail Duff (page 22):

Refreshing Lavender Potpourri
2 cups lavender flowers
1 cup costmary
½ cup peppermint leaves
6 tablespoons rosemary leaves
2 tablespoons each juniper berries and allspice berries
4 tablespoons orris root powder
4 drops lavender oil
2 drops each rosemary and peppermint oil

People have been making potpourri for centuries.  I heard that when archaeologists opened some of the Egyptian tombs they found potpourri in clay jars that was still fragrant after thousands of years. Pioneer women often gathered herbs and flowers to create wonderful fragrances in their homes.  You can too!  You can purchase all the ingredients you need but why pay for store-bought ingredients when you can gather them yourself.  I found the juniper berries in a shopping center parking lot!  You can too! 

Lavender flowers will be blooming soon (here in the south anyway – those in the north will have to wait a few more weeks).  Peppermint and rosemary are also growing now in the south.  All three of these plants are available in home improvement centers throughout the spring season and they are all easy to grow.  For those of you in the north, you may have to grow your rosemary in pots; it is only winter hardy from zone 7 (in a protected spot) to zone 10.

Women in the last half of the 19th century grew costmary in their herb gardens.  It is very sweet smelling. You should be able to find seeds or plants in the home improvement store as well. You can also find all these plants anywhere herbs are sold. Orris root powder can be omitted if you prefer. I have made potpourri with it and without it. The purpose of the orris root powder is to hold the scent. It is considered a ‘fixative’ to help the scent last longer. Orris root is the rhizome of the iris flower. If you happen to have some iris flowers that you no longer want, pull up the rhizome, wash it off and grate it up. Let it dry and it is ready to use. Orris root has no scent when first dried; it can take up to two years for the orris root to gain a scent on its own. If not scented with oils as part of a recipe, the orris root will have a fragrance like violets.

Dry the herbs and flowers in the sun and be sure they are completely dry before you store them.  All ingredients store well in glass jars.
Juniper berries drying in the sun on my patio.

Making your own potpourri is fun and doesn’t have to cost a lot of money, if any at all. If you keep your eyes open this summer you can gather up ingredients you can use to make your own potpourri this fall!

Wednesday, May 9, 2012

Do You Have Food Storage?

Have you ever been in a hurricane or the aftermath of a hurricane without power or water?  Have you ever been in an ice storm where the power was cut off for days?  Have you ever been in a snow storm where the roads were blocked and you couldn’t get out?  Have you ever been laid off?  Have you ever been sick and could not work?  What would you do if you could not get to the store? What would you do if the stores were all closed or the shelves were empty?

My church counsels us to be prepared for adversity in life by having a basic supply of food and water, and some money in savings.  Being prepared in such a way is the first step on the journey to self-reliance. Today, I would like focus on one of the most fundamental steps along that journey; having a supply of food.  You should have a minimum of a 3-month supply of shelf stable food for you and your family (including pets). 
Many LDS church members store one years’ worth of basic supplies like rice, powdered milk, honey, wheat and beans.  Then, a three month supply of the everyday foods you eat.  Having this much food stored away gives you a feeling of peace.  When adversity comes your way, having food storage allows you to spend what money you do have on other critical things.  You can rest assured that you and your family do not have to worry about how you are going to eat.

You may be wondering where you put all this food.  Well, the easiest place to put your food storage is in a basement, if you have it.  I do understand if you are saying to yourself, “But I don’t have a basement.”  I don’t either.  Those of us without basements need to think creatively on where we can put our food storage.  I promise I have lots of ideas and tips to get it all to fit in your house, apartment or condo.  Watch for some posts on that in coming months.

Before we need to have a place to put our food storage, we need to have food to store.  You don’t need to purchase it all at once.  My one year supply of food and other necessities took me 3 years to gather.  Start slow and gradually add to it.  When you go to the grocery store, buy an extra can of vegetables and an extra can of fruit.  Then, on your next visit, buy an extra bag of rice. Slowly, build up a week’s supply of the foods your family likes to eat.  After you have a one week supply, set your goal at two weeks, then one month, and so on.  Some of it, you don’t have to purchase at all.  You can grow it. Every year, I grow a one year supply of all the vegetables we eat in our house.  Don’t have a garden?  It isn’t too late to start.  I live in the south and I don’t have this year’s garden in yet.  I plan to put my seeds in sometime during the next week or two.  I’ll post pictures and show you.  Don’t have any room for a garden? You can grow select vegetables and herbs in pots on a patio.  All my tomatoes and sweet potatoes will be grown in pots.

One common problem with food storage is finding new ways to cook with it. I am constantly looking for new ways to use my food storage so everyone in my house will eat it. Recipes that receive the ‘thumbs up’ signal will be shared here. My goal is to post food storage recipes two to three times a month. Can’t wait that long? Check out my blog list. The blogs listed there frequently feature shelf stable recipes you can try right now.

Monday, May 7, 2012

Five Uses for Vinegar Your Great-Grandmother Would Approve

Most commercial products we have access to are loaded with chemicals that are bad for your health. Have you ever looked at the warning labels on cleaning products? What about lawn care products? There are organic alternatives, but they can be pricey and just as lethal. I propose a different alternative: vinegar!

I am sure you all have heard about the many uses of vinegar. You can find them all over the web. Here are five such uses that you can easily put into practice now. They will save you money and eliminate the need to purchase commercial products. These are all jobs your great-grandmother would have accomplished using good ole vinegar.

1.   Do you use liquid fabric softener in the washing machine?  All those chemicals that make your clothes smell fresh and feel soft are not needed.  You can make you clothes incredibly soft, smell fresh and reduce the lint in the dryer with vinegar.  Fill up the liquid fabric softener dispenser with vinegar every time you wash clothes.  I promise your clothes won’t smell like vinegar and they will last longer too.

2.   Do you use a rinse agent in the dishwasher?  Most new dishwashers use a reduced amount of water. They require a rinse agent to help keep the food particles off the dishes.  What are the ingredients in a rinse agent anyway?  I personally have no idea but I am sure you can’t eat them.  Let your rinse agent dispenser completely empty and then refill it with vinegar.  Your dishes will shine and you won’t have spots on the glasses either.  Word of caution, don’t add vinegar if your dispenser has rinse agent in it, wait until it is empty then refill it with vinegar.

3.   Do you have unwanted weeds on your patio or in the driveway?  What about in your landscaping beds?  Grass killer is expensive and full of harmful chemicals that you shouldn’t get on your skin.  Vinegar works just as well. I keep mine in a sprayer bottle – buy a plastic sprayer bottle at a big box store and label it with a permanent marker.  When you see a weed pop up, use the sprayer bottle to zap it.  Cover the weed completely; 2 or 3 squirts will work.  The weed will be gone in a few days at the most.  If you are spraying near plants you want to keep, wait until evening or spray on a non-windy day. You don’t want to get the vinegar on the desirable plants.

4.     How many different kitchen cleaners do you have?  They really are not necessary.  Vinegar is an excellent alternative.  For the kitchen counter tops, add a mix of 50/50 water and vinegar to a spray bottle.    Just spray and wipe as you normally do.    This mixture works on the weeds too if you only want to keep one spray bottle.  However, with a mixture of water and vinegar, you may have to spray the weed more than once. 

5.     How many different bathroom cleaners do you have?  One for the toilet, one for the shower, and something different for the sinks and counter tops?  Strong chemical cleaners are not needed in the bathroom either.  To clean the toilet, try ½ cup of vinegar in the bowl with a few drops of liquid dish washing liquid.  Swish with the toilet brush and flush.  For the bathroom sink and counter tops you can use the 50/50 water and vinegar mix same as in the kitchen.  I just read about a new ‘recipe’ using vinegar for the shower. It says the new recipe will take off dirt, hard water stains as well as mold and mildew without scrubbing.  I will try it in the next few weeks and let you know the results!

I buy a lot of vinegar and use it to clean all kinds of things.  Try it!  I bet you will find it does a better job, and it’s cheaper to use too.   The best part of all is that it doesn’t come with a warning label!

Saturday, May 5, 2012

What is Self-Reliance?

To most people self-reliance means standing on your own two feet.  Want to buy a house? Save up the down payment – don’t ask family members to help. My idea of self-reliance is a little deeper than that. It more closely follows the teachings of my church.  I am a proud member of the Church of Jesus Christ of Latter Day Saints.  This is how my church defines self-reliance and I think it is a great way to look at it:
  • Learn to love work and avoid idleness
  • Acquire a spirit of self-sacrifice
  • Accept personal responsibility for spiritual strength
  • Accept personal responsibility for health, education, employment, finances, food, and other life-sustaining necessities
  • Pray for faith and courage to meet challenges that come
  • Strengthen others who need assistance
And finally, being self-reliant allows you to be a leader for others who have not yet started their journey. As a leader you can coach and teach others to start on a journey of their own.  Improve your life through your own journey to self-reliance and you can improve your community and your country as well!

Today, we live in a global society. Many of the things we purchase for life-sustaining necessities are imported from other countries. That isn’t how our great-grandparents lived. Perhaps, we can relearn some of the forgotten skills they had and reduce the need for such a heavy dependence on others. 
Self-reliance doesn’t just mean temporal self-reliance. The scriptures provide the opportunity to make bad men good and good men better. Your spiritual strength will shape what you do and how you act. Let it guide you to make improvements in your community where ever you live.

Friday, May 4, 2012

Welcome to My Blog!

I hope you will visit often and stay awhile. While you are here, you can learn how to return to a simpler way of living that will help you save money, live healthier, and put you on the path to self-reliance and provident living. 
My goal is to share something new about provident living in every post.  Some of the things I plan to write about, I have been doing for years.  Some of the things I will share will be new to me too and we can learn together.  Provident living and becoming self-reliant is a journey not a destination.  Let's travel together!