My husband brought home some garlic and herb butter from the store a few weeks ago. We tend to eat plain things so neither of us had ever tasted it before. Wow! Was it good! Wow! Was it expensive! Best to save things like that for special occasions. Then I thought, " I bet I could make it cheaper!" I had to try!
I happen to have a quart of heavy cream in the refrigerator. I bought it to make whipped cream for a New Year's Day cake. The whipped cream never happened! Anyway, the 'best by' date on the carton was the middle of February and I knew I had to use it soon. I thought it would be a great idea to use it to make my own garlic and herb butter!
The first step is to make the butter. It is super easy. Start by setting the cream on the counter for a few hours. Fresh cream should be room temperature to make butter. (It really doesn't have to be room temperature, but the cream will turn to butter a lot faster if it is room temperature!) Pour the cream into a jar. I used a quart canning jar. Fill the jar halfway. A half gallon jar will work too, I just don't have one. Here is a picture of mine.
To make butter, shake the jar. It is just that simple. However, if you would like a detailed explanation of what will happen to the cream as it goes through the 'stages' to get to butter, you can read all about it here. I wrote this post a while back but the information is relevant today as well. Go ahead and click on the link, I will wait for you!
OK, now that you understand what you are going to get when you shake the jar, we can move to the final result, butter and buttermilk! Please don't throw out the buttermilk, it adds a wonderful flavor to homemade bread! I poured mine into another jar to save it. The butter must now be washed. This step is critical! If you omit it, you won't be able to eat the butter! Trust me on this! Wash the butter in cool water. I washed mine about five times. The number of times isn't as important as the results. You must wash it until the water runs clear.
There are lots of different ways to wash the butter. I usually 'knead' it against the side of a bowl with a slotted spoon. As the water turns milky, I pour it out and add fresh.
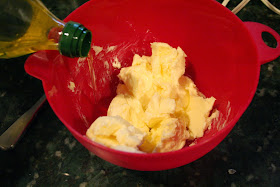
Once the butter is washed, it is ready to mix with the herbs and garlic. The first thing I did was add some olive oil so the butter would be 'spreadable' when chilled. (I decided that I wasn't going to store this in my butter jar on the counter since the cream was so close to its 'best by' date.)
Mix it well. I mixed mine by hand with a spoon/spatula. However, I must tell you, I almost gave up and went to get the beaters! If you run out of patience when mixing by hand, by all means, grab the beaters! It will be much faster. When the oil is incorporated, it is time to add the garlic and herbs.
Reading the label on the container of butter my husband bought, the herbs used were rosemary, basil and thyme. I had all three in my pantry! After I added the herbs, I added the garlic.
Mix well and put into a container.
Here is the recipe I used to make this. My quart of heavy cream made about 2 cups butter. (I am guessing here, I didn't measure it.) To that I added:
1/4 cup olive oil
2 TBS of garlic powder (I grew my own garlic and made my own powder. Ditto for all the herbs.)
1/2 TBS Thyme
1/2 TBS Rosemary
1/2 TBS Basil
1/2 tsp salt
While I liked it a lot, I think I used a touch too much rosemary. Next time I will only add a teaspoon of rosemary to start. Then after tasting it, I will add another teaspoon, if needed.
The best thing about making your own herbed butter is you can make it anyway you want! In this instance, the butter is like a blank canvas. Nothing wrong with using your favorite spices & herbs with store bought unsalted butter either!
If the herbs in my recipe above don't motivate you, try one of these:
Herb Butter from bonappetit.com
Italian Herb Butter from food.com
Herb Butter from thekitchn.com
I have been using mine on vegetables, and homemade dinner rolls. Before it is all gone, I am going to try it on seafood!
What a great idea to add a touch of elegance to your dinner menu!


No comments:
Post a Comment
To help eliminate spam on this blog, your comment will be moderated.