No Knead Artisan Bread
1 1/2 cups very warm water. (The original recipe calls for 100 degree water. I measured the temperature to be sure it was accurate.)
1/2 TBS salt
3/4 TBS yeast (I used 1 TBS of instant yeast.)
3 cups all-purpose flour (I used a combo of whole wheat flour I made myself and store bought all purpose.)
Extra flour for dusting
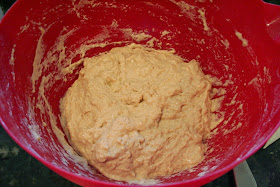
Start with the 100 degree water and add it to a bowl. Then add the salt. Stir a bit to dissolve. Add the yeast and let it sit for one or two minutes. Stir it in. It is OK if it doesn't all dissolve. Measure the flour accurately by leveling off the measuring cup with a knife. Add the flour and mix until it all comes together. I used a wooden spoon. Since you are so dependent on the yeast doing it's thing, I would not use any metal utensils. Wood or plastic are best. Here is a picture of mine all mixed.
Notice the dough is sticky. It won't look the same as a dough ball that you would knead before letting it rise. Once it is mixed together, cover it with plastic wrap or the lid to the bowl and let it sit at room temperature for two hours. This is what it should look like when it is done.
Mine didn't take two hours to rise. I was cooking a turkey to make meals for the princess and the kitchen was hot. (30 pound turkeys don't fit in either solar oven I have.) Turn it out onto parchment paper. Dust the paper with flour liberally first. (For this recipe, you really need the parchment paper.)
The instructions say to fold the dough in half twice, then roll it into a ball. I didn't do that, I folded mine half a dozen times before I rolled it into a ball. I guess you can take the need to knead out of the recipe but you can't take the need to knead out of the bread maker!
When it is ready to bake, it should look like this.
Dust the top with some additional flour and slice the dough three times before baking it. This will help the dough keep its shape and make it look pretty. I also trimmed up the parchment paper a bit.
This dough should be baked at 450 degrees. Before preheating the oven, add a flat cookie sheet or baking stone to the middle rack. Also, place a small baking pan on the bottom rack filled with one cup of water. This is what gives the bread a nice crust. Here is mine. I just turned on the oven to preheat it when I took this picture.
BTW, neither solar oven I have will go to 450 degrees. (That is why I want a new one, just out on the market, that will!)
Then, when ready, slide the dough onto the cookie sheet. (This is why you need the parchment paper!) Bake 20 to 25 minutes. It's done!
For the purpose of full disclosure, I must state that I had to make this bread twice. The first time I made it, it wasn't successful. Why? Because I got cocky! Normally, I don't need to measure the ingredients accurately. I rarely follow a recipe and add all sorts of extra 'stuff' to my dough. I can tell if the bread will be successful by the look of the dough ball. If needed, I will add a bit more water or flour to make the dough ball 'just right'. Not so in this recipe! The dough remains sticky the entire time you are working with it. My first try, the dough failed to rise properly. For the second try, I measured everything accurately and it worked perfectly!
I am going to use this for sandwich bread. It looks lovely and tastes delicious! It really is artisan bread without all the work!


No comments:
Post a Comment
To help eliminate spam on this blog, your comment will be moderated.